StrandVision Digital Signage
715-235-SIGN (7446) | www.StrandVision.com
- Home
- Building a Linux Digital Signage Player / Server
Building a Linux Digital Signage Player / Server
Save the cost of a Windows Operating System by creating this Linux Digital Signage Player
Get a stable and less costly linux digital signage player pc or setup an on-premise server by following these steps. Or, if you would like one that is pre-configured and ready to run, you can buy them from us. This document designates specific instructions for the ![]() On-Premise server or the
On-Premise server or the ![]() Signage Player Workstation with the symbol shown. Most of the images can be clicked on to see a larger version of the image.
Signage Player Workstation with the symbol shown. Most of the images can be clicked on to see a larger version of the image.
![]() Following these instructions will destroy everything on your computer's hard drive!!! Select a computer that you are ok to destroy and rebuild as this linux digital signage player pc.
Following these instructions will destroy everything on your computer's hard drive!!! Select a computer that you are ok to destroy and rebuild as this linux digital signage player pc.
Download and Create DVD/CDs
- Go to http://www.opensuse.org and click on the "Get It" button to download the latest DVD ISO images.
- Select whether you have a 32 or 64 bit PC. All of our recommended specifications are for a 64 bit pc.
- Select the download method.
- Click download. This will take several hours to complete the download.
- Burn a DVD for each of the ISO images (Note: ISO images are not written to DVDs the same way as files - if using Nero, select Burn Image from the file menu)
- Be sure to label each DVD after burning them.
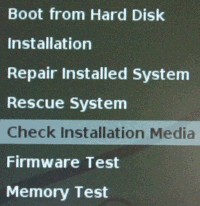
Test the DVD
- Boot from the DVD to run the installation program.
- If the Suse logo does not appear, you may have to go into your computer's firmware bios configuration to enable booting on the CD before the hard drive.
- Once the Suse logo appears, use the arrow key to stop the auto-boot from the hard disk.
- Do the "Check Installation Media" for each DVD that was created.
Delete All Partitons
If this is not a new computer, you will want to clear all paritions from the hard drive.
- Select Rescue System
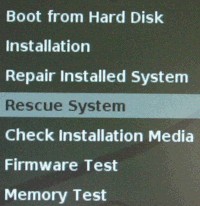
- Show all the partitions by typing "fdisk -l"
- For each /dev/hd? or /dev/sd? showing, type "fdisk /dev/???"
- type p <enter> to see the partitions.
- type the keys d <enter> followed by the partion number for each partition <enter>
- type p <enter> to make sure all of them are gone
- type "w" to write it.
- type "shutdown -r now" to reboot
Install The System
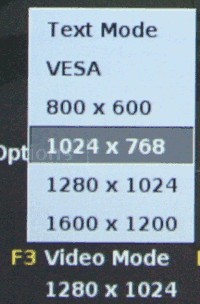
- For optimal support for all monitors in terminal, press F3 and set the screen resolution to 1024 x 768.
- Select the Installation menu.
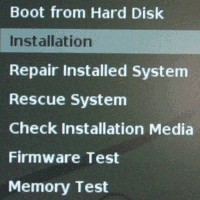
- Begin the installation and select the language for the product and your
keyboard layout.
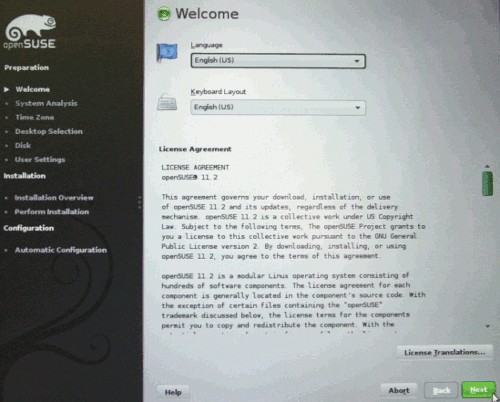
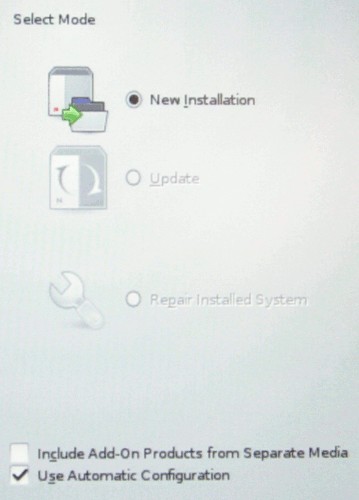
- Select New Installation
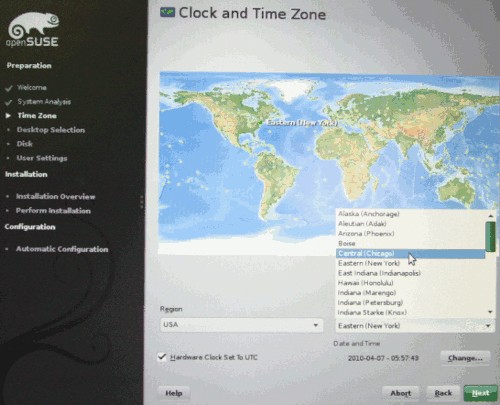
- Select the time zone to GMT.
 If creating an on-premise server, select Other, then select Minimal Server Selection (Text Mode).
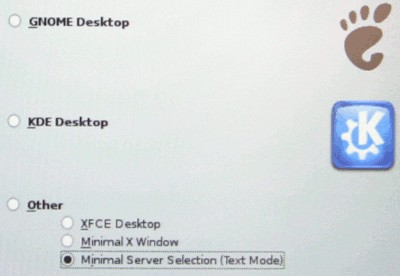
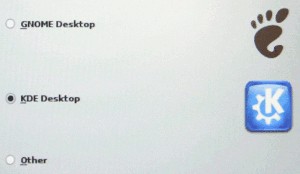
 If creating a signage viewing workstation, select KDE as your desktop.
- Choose the automatic disk partitioning unless you know what you are doing. It should remove all paritions and start from scratch.
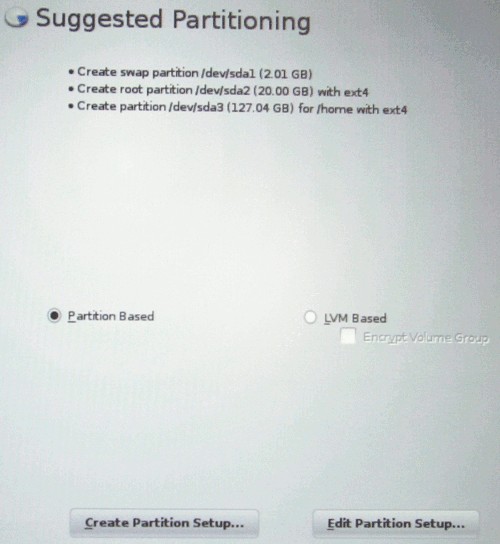
- Once it is setup, go to Expert Partitioning and for each volume, click on settings and change the "default mount by" to Device Name.
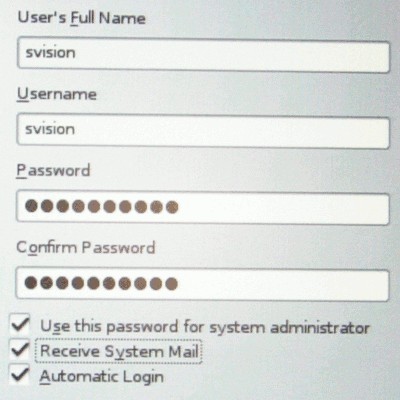
- Create the user svision with a password of your choosing that is secure and something you will remember. Be sure to check all checkboxes so that this is the system administrator password as well.
- The next screen shows the configuration to build. There are a few changes that need to be made.
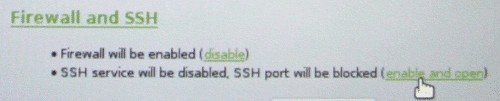
- Enable SSH by scrolling to the bottom of the screen at the Firewall and SSH section. Click on "enable and open".
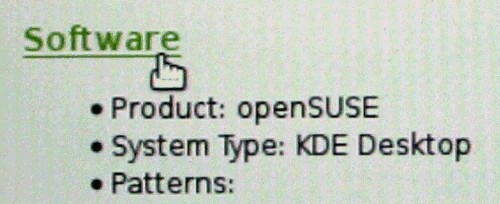
- Click on the Software tab to configure the software that will be installed.
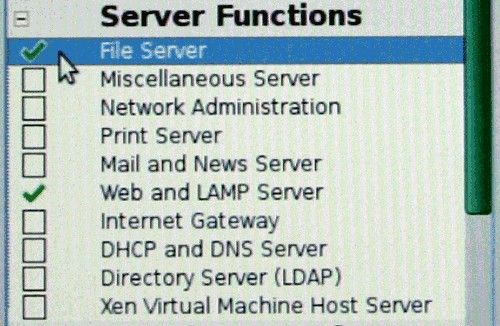
- Click the checkbox for Web and LAMP server and File Server under Server Functions.
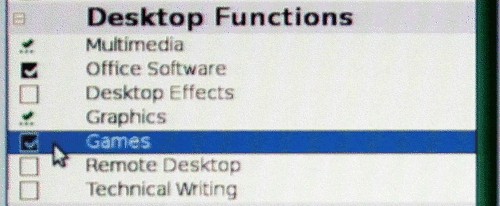
- Right click on Games and Office Software under Desktop Functions and select do not install if they are checked.
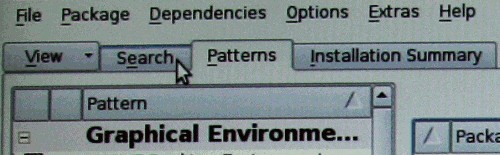
- Click the "Software Details" button on the lower left side of the screen.

- Click on the "Search" tab on the upper left side of the screen.
- Type sensors into the search box and check the box next to sensors.

- Type php5 into the search box and check the following:
- bcmath
- bz2
- calendar
- curl
- exif
- ftp
- gd
- mbstring
- mcrypt
- sockets
- xsl
- zip
- zlib
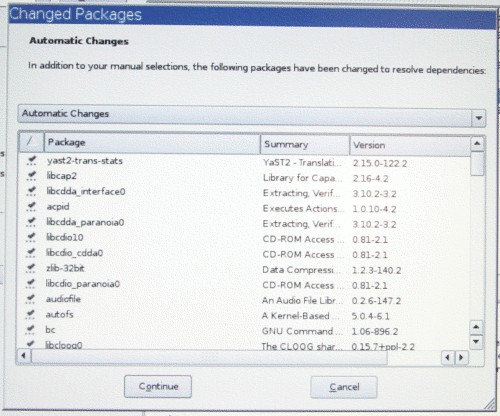
- Click on Accept in the lower right corner and click "Continue" to accept all the automatic changes shown.
 NOTE: Clicking "Install" on this confirmation screen will overwrite your pc's hard drive! If you are unsure, click Back and abort the installation.
- Click on the Install button on the lower right side of the screen.
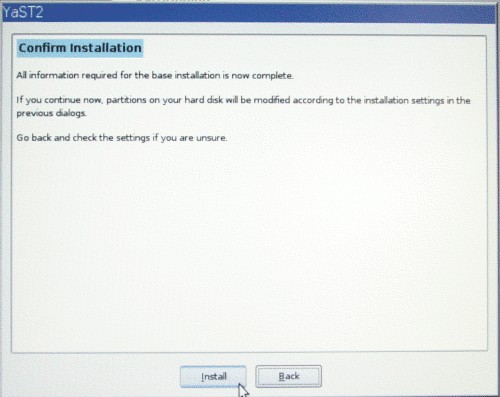
- The system will now build the linux platform which will take about 30 minutes.
Add Nvidia Driver Repository
- Open firefox and type the following into the url and confirm everything
- http://opensuse-community.org/nvidia.ymp
- Select Edit, Preferences and set the home page to http://localhost
Install APC and Memcached
- Open up firefox from the desktop and browse to opensuse.org
- Click the "Get it" button
- type "APC PHP5" in the search box
- run the 1 click install to install the PHP5 intermediate code cache and optimizer
- type "memcached" in the search box
- run the 1 click instll to install the memcached service
- type "MEMCACHE PECL" in the search box
- run the 1 click install for the php5-pecl-memcache to add the PHP connection to the memcached service.
Update the Server
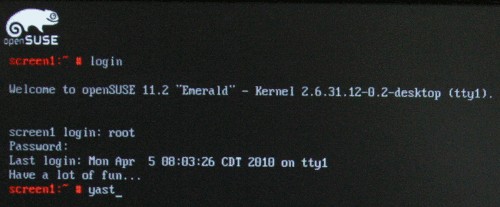
- Press Ctrl-Alt-F1 and log in as root
- Refresh the repositories by typing "zypper ref"
- Update the server by typing "zypper up"
- restart the server by typing "shutdown -r now"
Configure Linux with YAST
You are now ready to configure several system properties to run properly with the on-premise server or the signage viewing workstation using YAST.
- Press Ctrl-Alt-F1 and log in as root
- Type YAST on the command line once you are logged in.
Configure System Services
- Select System Services from the System menu.
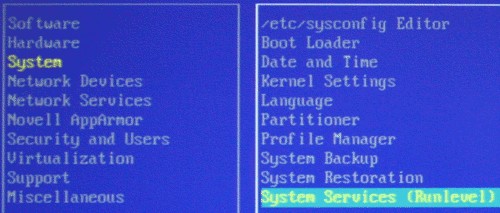
- Enable Apache2 for the web server
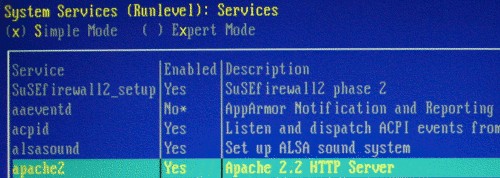
- Enable MySql for the database usage

- Enable NTP to synchronize the time to atomic time.

- Enable Memcached to allow temporary information to be stored in memory instead of on the hard drive
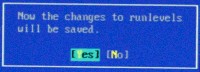
- Click Alt-O to save the settings and select Yes to save the changes to the runlevels.
Configure the Ethernet Adapter for Static IP Address for On-Premise Server
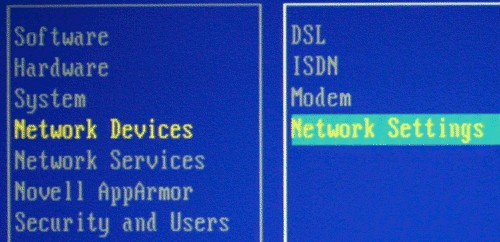
- Select Network Settings from the Network Devices menu.
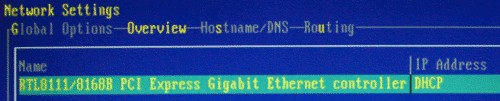
- Select the proper network adapter (normally eth0) and click Alt-I to edit it
- Setup the Dynamic or Static IP Address for your network and enter a hostname of screen1.strandvision.com for the first StrandVision device on your network, screen2.strandvision.com for the second, etc. Press Alt-N to save.

- Say yes to the warning about no zone be defined if it appears.
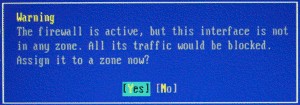
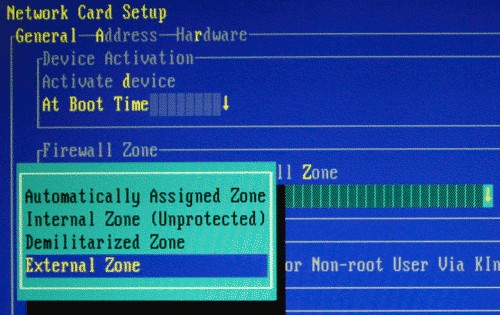
- (if it does not appear, Press Alt-G to set the general preferences). Press Alt-D and select "On Cable Connection" to activate the device. Press Alt-Z and set it to the external zone.
- Select the Hardware tab with Alt-R. Press Alt-E to change the device name. Set the rule to "Bus ID" instead of the default "Mac Address".
- Accept the changes by pressing Alt-N (the next button).
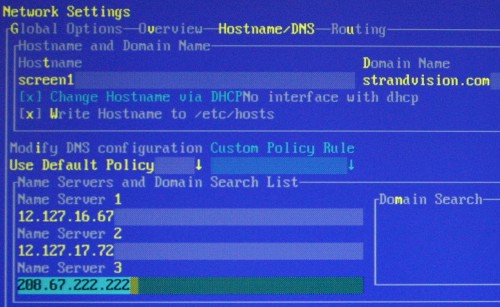
- Press Alt-S to edit the hostname and dns entries. Enter screen1.strandvision.com for the first StrandVision device on your network, screen2.strandvision.com for the second, etc. Setup your name servers appropriately.
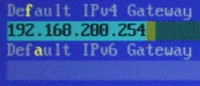
- Press Alt-U to setup the routing gateway for your network.
- Press Alt-O to save
Configure the Web Server
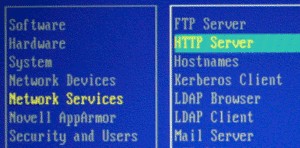
- Select HTTP Server from the Network Services menu.
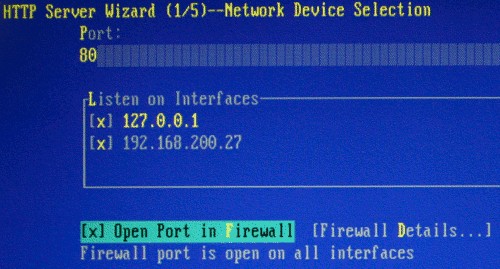
- For the first wizard step, open the port in the firewall by pressing Alt-F and click Alt-N for next.
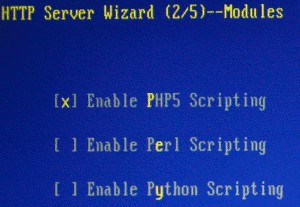
- The second wizard step is ok with just PHP scripting enabled. Click Alt-N for next.
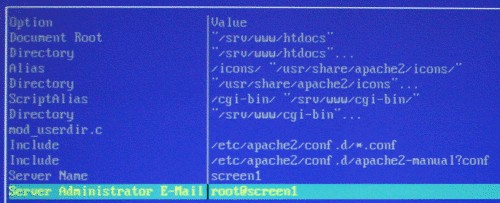
- If desired, you can change the administrator email on step 3. Click Alt-N for next.
- Step 4 allows you to add a virtual host. Click Alt-A to add a new virtual host.
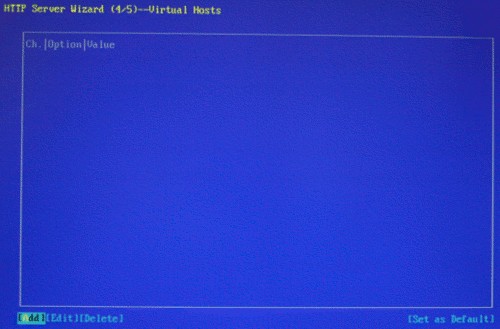
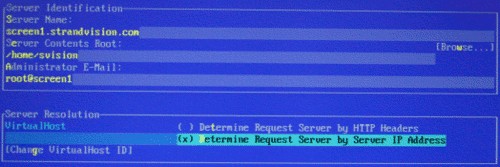
- Enter screen1.strandvision.com as the server name of the first StrandVision device you have on your network, screen2 for the second, etc. Enter /home/svision/public_html as the server contents root. Enter your email address if you wish or root@screen1 for the system user. Press Alt-D to use the IP address. Press Alt-G and Alt-O to empty an empty virtual host id.
- Press Alt-N to go to the next step
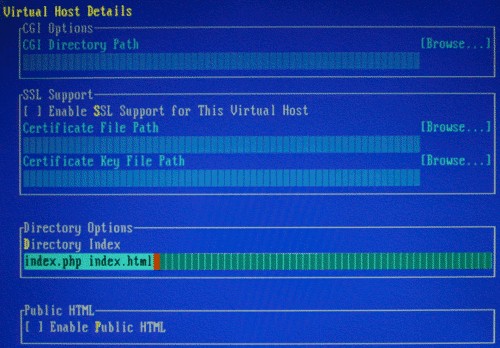
- Press Alt-D to enter the directory index options of "index.php index.html". Click Alt-N twice to finish adding the virtual host
- Step 5 of the wizard shows the summary.
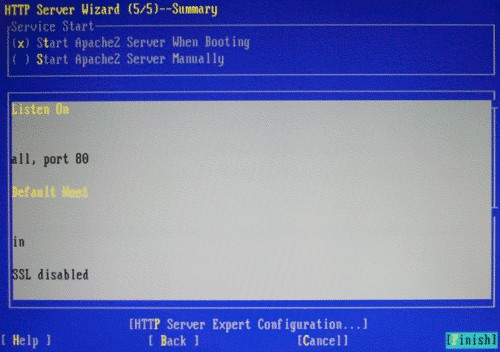
- Click Alt-P to setup some expert settings.
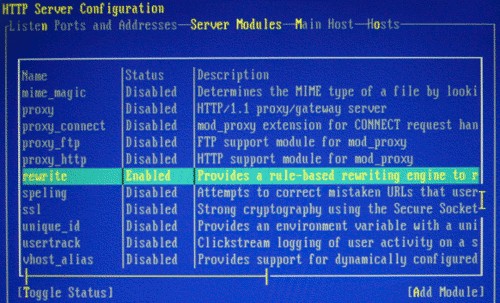
- Click Alt-S to modify the server modules. Find Rewrite and press Alt-T to enable mod-rewrite.
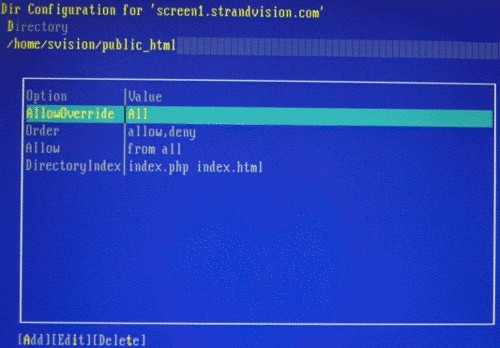
- Press Alt-H for hosts, Alt-I, go to the directory field and press Alt-I. Enter "All" for AllowOverride.
- Press Alt-O twice to save it and press Alt-F to finish.
Configure the NTP Server
- Select NTP Configuration from the Network Services menu.

- For 3 random servers, do the following:
- Press Alt-A to add a new server.
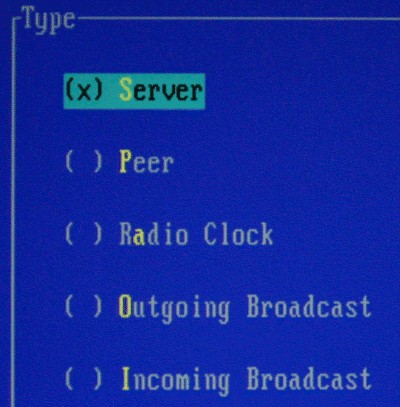
- Select Server as the synchronization type.
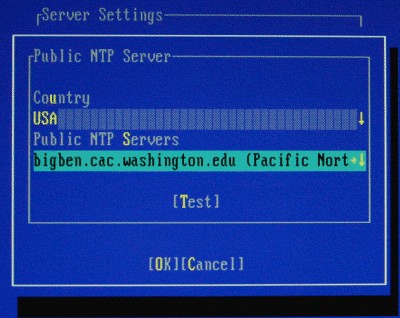
- Press Alt-S and select Public NTP Server.

- Press Alt-S and select your country and a random public server.
- Press Alt-T to test the connection. If it could not connect properly, select a different one.
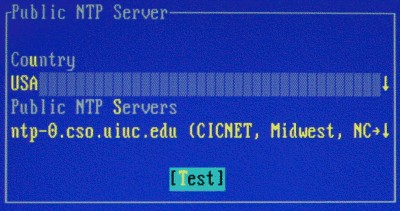
- Press Alt-O twice to save it.
- When you have added all 3 servers, press Alt-O to save them.
Exit out of YAST
- Press Alt-Q to exit out of YAST
Install StrandVision Startup Code
- set your default directory to the web directory by typing "cd /home/svision/public_html"
- type "curl http://www.strandvision.com/webcache/linuxremote.tar.gz | tar xvz"
- If that does not work, copy the file to a USB drive as follows:
- Log into your StrandVision account and click on Signage Pages / View Signage.
- Go to the bottom of the screen and click on "get initial player code" and save to the usb drive.
- Plug the USB thumb drive into a usb port of the computer.
- type cat /proc/partitions. Make a note of the last one which is the volume for the usb drive. (for example sda1)
- type mkdir /flash if you have never done it on this computer before.
- type "mount -t vfat /dev/sda1 /flash".
- you can now see a directory of the usb drive by typing "ls /flash".
- extract the file with "tar -xvzf /flash/filename
- type "chmod u+x remoteinstall.sh"
- Initialize the system by typing"./remoteinstall.sh"
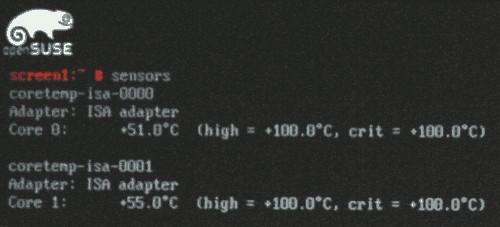
Configure Sensors To Be Read
You are now ready to configure the system to read the various sensors that the system has available. This will be done in the terminal.
- run the command "sensors-detect" and press enter for each question that appears.
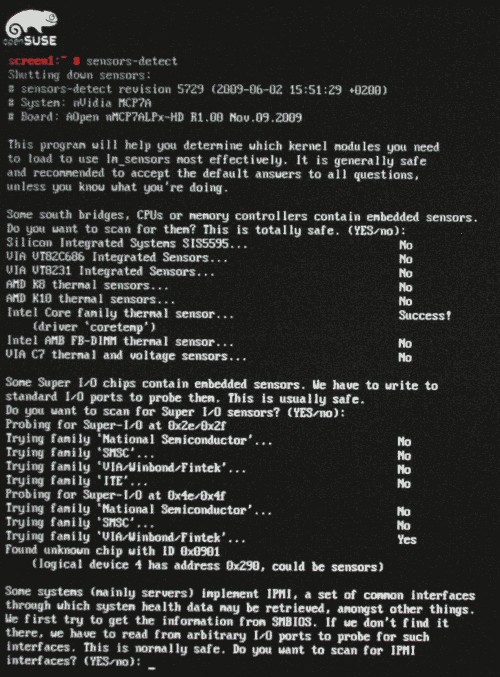
- reboot the system by typing "shutdown -r now"
- when it comes back up, log in and type sensors. You should see some sensor information appear.
Run the Burn In Test File
- type "cd /home"
- if there is not a test.sh file:
- Type "vi test.sh"
- insert this line:
find / | xargs tar cf - | bzip2 > /dev/null&
- hit <esc>, press yy to copy the line, then hit p to paste the line 50 times.
- press the keys <escape> : w q <enter> to save the changes
- type "chmod u+x test.sh"
- To do the burnin, type: "./test.sh &"
- type "top -c" to see a continuous running status of the server load. Press "q" to exit.
- There will be occasional times when messages go all over the screen - and it will be very slow, so be sure you are done configuring.
- Check it in 24 hours. If still running, all is good. you can either type "halt" to shut down the server or "killall bzip2" to stop all processes
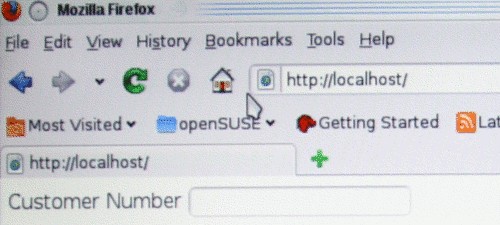
Check Web Server
- Open up Firefox and type localhost.
- Open up a web browser from a separate computer and type the server's ip address.
- It should come up with a spot to enter the StrandVision username and password. This is where the customer starts setting up the system for their unique StrandVision Digital Signage account.
Configure the Sound
- Click on the speaker in the lower right corner and select "Mixer"
- Click Settings, Configure Channels
- Show the Line and Mic inputs
- Set the volume to the maximum for the Master, PCM and Line controls.
- Mute Line and Mic inputs
- Close the window.
Configure the Flash Player
- open up the flash standalone player by clicking the start icon and typing "flash" in the search bar.
- type http://localhost/flash/sign.swf into the url
- add this to the bookmark
- right click on the display and click settings
- click on the second icon and allow access to microphone and camera for localhost and set the remember checkbox
- click close to save the settings.
- Close the flash player by pressing Alt-F4
- add a desktop icon for flashplayer http://localhost/flash/sign.swf
Disable Power Management, Screen Saver and Set Background Images
- At the desktop, click on configure desktop, display. Turn the power control off and set the power button to shut down the computer.
- Go back and in the screen saver section, turn the screen saver off
- Go back and click on Login Screen, disable the themed greeter and change the background to /home/svision/background.jpg
- Close the desktop window
- Right click on the desktop
- select wallpaper
- browse to /home/svision/background.jpg
- Set it to "scaled"
Set Screen Resolution on Linux Digital Signage Player
To permanently change the screen resolution on the StrandVision Linux Digital Signage Player, do the following:
- open up the terminal window from the desktop
- type su (to go to root user)
- enter the root password (every player is different contact StrandVision for details)
- type sax2
- pick the new screen resolution and save it
- optionally, you can run sax2 -a to auto configure to the current screen or sax2 --vesa 0:1024x768@60
- reboot the pc and it will use that resolution from that point forward.
Restore a StrandVision Image
To restore a StrandVision image, follow this link. To set a static ip address, follow these instructions.
To Add Samba File Sharing:
Make Hard Drive Image (StrandVision Only)
- Using a Windows, Mac or Linux pc, download CloneZilla Live. There are several options, but it is recommended to download the Debian stable release at http://clonezilla.org/downloads.php.
- Create a bootable CD from the .iso image with your burning software.
- Locate an external USB CD / DVD drive and attach it to the StrandVision R350 Linux PC
- Put the CloneZilla bootable CD into the external Drive
- Turn on the player
- Press the delete key several times until it says "entering setup"
- Select the "Boot" menu by pressing the right arrow twice
- Select "USB Drives" with the down arrow and press enter
- Find the USB DVD drive and position on it
- If it is not the top item in the list, press the minus key on the keypad to move it to the top
- Press escape to go back
- Select "Boot Device Priority"
- Find USB DVD drive and position on it
- If it is not the top item in the list, press the minus key on the keypad to move it there
- Press F10 to exit. Save the settings if it asks
- The system will reboot using the dvd drive
- A CloneZilla screen will appear. Press enter a few times until you get to the imaging options.
- Image the boot drive to an external hard drive
- Once finished, restart the program again.
- make an ISO image from the hard drive image just created
- Upload to the production servers.
- Follow these instructions if you are a production house.
- To set a static ip address, follow these instructions.
Other Commands
- Create a tar file: tar -cvzf filename.tar.gz dirname/
- Find file: find dir -name filename*.*
- create disk image to a gzip: dd if=/dev/sda conv=noerror,sync bs=1024 | gzip -c9 > /flash/filename.img.gz
- clear unused portions with zeros: mount -t ext4 dev/sda1 /flash; dd if=/dev/zero of=/flash/delete.me bs=8M; rm /flash/delete.me; umount /flash