StrandVision Digital Signage
715-235-SIGN (7446) | www.StrandVision.com
- Home
- Service & Support
- Knowledgebase
- Instructions for Audio
Instructions for Audio
Instructions to Include Audio On Your Signage
Since there are so many different digital signage network configurations that can happen in Windows with sound cards, this guide will review the steps to connect the speakers of your Digital Media Player pc to an external audio source such as a CD player or Muzak audio player. The basic analog connections are the same in any PC, whether it has the on-board (built on the motherboard) or a separate sound card.
If you prefer to use the electronic royalty free background music that works with the StrandVision Digital Signage system, check out this link.
Connect Your Digital Signage Hardware
The first step to play live background music on your Digital Media Player is to connect your audio source to the computer. All modern PC's have, at a minimum, a "Speaker out", "Line Out", "Line In" and "Microphone input". Some have the speaker connections labeled differently, but it is still basically the four connections listed. In order to utilize the StrandVision Digital Signage audio loopthrough feature, the "Speaker out" and "Microphone input" will be used. You may find that using the "Line Input" jack may work better for your audio device. Since this guide is describing how to set up the "Microphone Input" as the source, you need to configure for "Line Input" instead of "Microphone".
In almost all cases the I/O jacks are all 1/8" (3.5mm) stereo jacks and are color coded:
- "Mic" = Pink (red)
- "Line In" = Blue
- "Speaker" = Green
- "Line Out" = Black
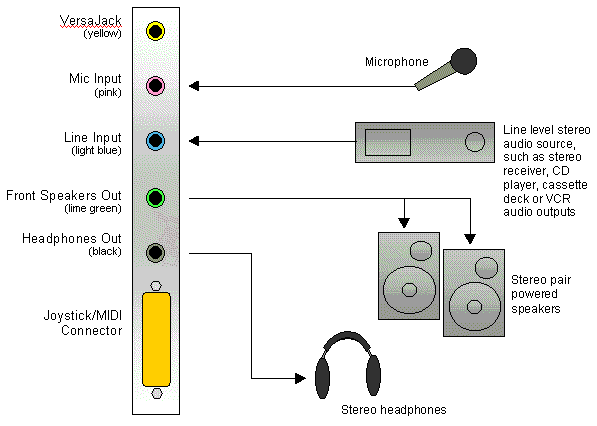
Figure 1 - Digital Media Player Sound Card Inputs and Outputs
1. Locate the Right Inputs and Outputs
Nearly every audio device has at least one stereo pair of outputs (also called "jacks") you can use as an audio source for your signage. Examples of audio sources include Ipods, CD or Muzak players. Some devices have a single 1/8" stereo connector which is usually the correct source. Older devices usually have RCA jacks (the standard type used to connect your stereo components). RCA jacks look like this:
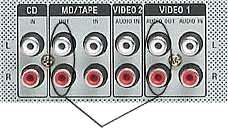
Figure 3 - RCA Output Jacks
RCA jacks are always color coded in white and red, or black and red. Red is always the right channel. If you see a Yellow jack, that is usually a video source. Select one of the following RCA jacks, located on your audio device. Any of these are acceptable for sending signal to your PC:
- Tape Out
- Video Out
- Aux Out
- And others - consult your stereo's documentation if you have any questions.
2. Connect the Audio Source
Connect the PC "Mic" input ("Pink" or "Red") from your computer to your external source. Use a cable with a 1/8" stereo plug on one end and the proper connector(s) for your audio source (usually RCA phono plugs - see Figure 2). Some systems can use 1/8" stereo plug to 1/8" stereo plugs (such as an Ipod). Keep the length of the cable as short as possible and at a maximum of 20 feet. Over 20 ft and you could get signal loss and frequency (fidelity) loss. Only use shielded audio cables, do not use "speaker" cables that are unshielded.
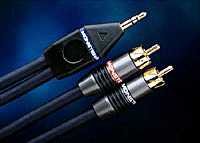
Figure 2 - RCA to 1/8" Stereo Cable
3. Connect The Speakers
Connect the "Speaker Out" ("Green") from your computer to the plasma screen or ceiling speaker amplifier. This will use similar cables to those described above.
Configuring Your Signage Account Settings
To enable the Audio Loopthrough capability
- Go to ../. with your web browser
- Click on "Use Sign"
- Enter your username and password
- Click the "Preferences" menu selection
- Find the setting called "Audio Loopthrough" and set it to "Yes"
- Click the "Save" button on the bottom of the screen
Start Pleviewing Your Signage
 To play your signage (to be able to adjust your volume settings)
- Click on the "View Signage" menu selection
- Click on Play Signage
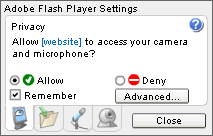
- If you see a box similar to that shown to the right, click on the "Allow" and "Remember" checkboxes and click close. That allows your microphone to be used from that point forward with no additional interaction.
- Resize the playback window so that you can see other screens
Set Up Your PC's Sound System
To Set the Recording Levels
- Click on the Windows Start button
 , then Control Panel
 - Click on Sounds and Audio Devices
- Click the Audio tab
- Click
 in the sound playback area (you will see a dialogue similar to Figure 3)
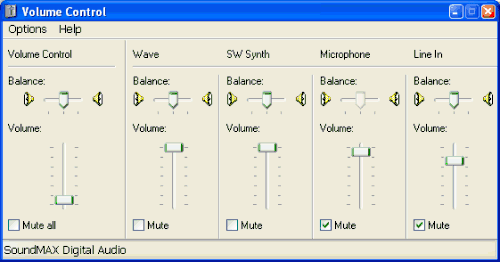
Figure 3 - Windows Playback Settings
- Make sure that all Microphone, Line In and any other input types have a checkmark in the mute checkbox (as shown in Figure 3). Failure to do this may cause sounds to play on your signage when you dont want it to.
- Adjust the playback volume to a reasonable level.
- Close the playback settings window
- Click in the sound recording area (you will see a dialogue similar to Figure 4)

Figure 4 - Windows Recording Settings
- Make sure that the Microphone input has a checkmark in the select checkbox (as shown in Figure 4)
- Adjust the volume to an appropriate level.
Start Your Production Digital Media Player
If you have not done so, install the production signage player.
- If it does not automatically start, reboot the pc to start the signage
- Press the "W" key to drop the digital signage from full screen into a window.
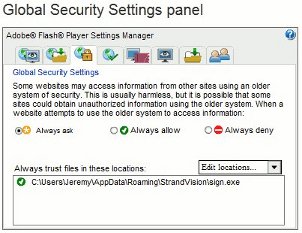 Right click on the signage and select "Global Settings".
- That opens up a web browser to the adobe settings area. If your web browser was open before, select from your browser tabs until you find the proper Adobe web page.
- Click on "Global Security Settings panel".
- Browse to your user storage location and select sign.exe from c:\users\ <yourusername> \AppData\Roaming\StrandVision folder for Windows 7 or Vista and c:\Documents and Settings\ <yourusername> \Application Data\StrandVision folder on Windows XP. You will not see the AppData folders unless the Windows Explorer is set to view hidden files in the tools/options setting area.
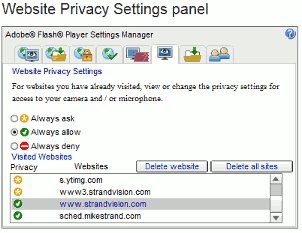 Click on the "Website Privacy Settings panel"
- Locate all strandvision.com web sites and select "Always Allow" for each. That will allow the microphone and capture card to be accessed from the Digital Media Player software to allow live tv and background music to work properly.
Your setup is complete!