StrandVision Digital Signage
715-235-SIGN (7446) | www.StrandVision.com
- Home
- Service & Support
- Knowledgebase
- StrandVision Digital Signage Network
StrandVision Digital Signage Network
Installing Digital Signage Software, Hardware and Networks
Many companies in diverse industries are interested in digital signage and the employee communication and business marketing advertising opportunities that it offers. However, they are unsure how to coordinate digital signage hardware, software, and installation of the digital signage system.
For this reason, StrandVision Digital Signage has developed this digital signage installation document that will help guide you through the process of installing digital signage (or using a contractor to do the digital signage install for you). This document does not provide specific instructions about how one would go about demolishing a wall or finishing drywall. However, it details the process of construction so that one can accurately explain the process to potential customers or contractors and assist you in screen placement. REMEMBER: Check and follow your local building codes. Permits may be required and historically preserved facilities may need special steps.
It is also important to note that this document discusses a number of installations using both wired and wireless Internet connections and wired and wireless video signal transmission.
In general, both wired Internet and wired video tend to be more reliable than their wireless counterparts. This is due to a number of factors related to wireless interference and the distance a wireless signal can travel. Currently, wireless Internet connections are fairly reliable and a good alternative to using cable in many applications as long as they are set up appropriately to ensure good signal quality. In addition, for basic installations where the distance from the computer to the screen is short and quality is not as important, wireless video transmission can be a reasonable option.
For the highest level of reliability, a hard-wired connection is best. RF interference, metal studs in walls, or other metal within the building structure does not affect this type of connection. The connection is also secure since an outside source cannot pick up the wireless transmisison. In addition to security, unless a cable is cut or distribution hardware is faulty, a hard-wired connection generally offers "install and forget" convenience.
Hard-wire installations
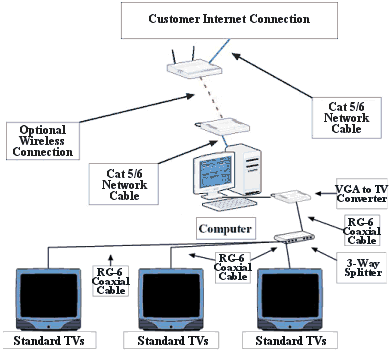
There are two levels of hard-wire installations for Digital Media Player installations. The first and least expensive option is the hard wiring of standard TV screens with coaxial cable. The system is very similar to a home cable system. The cable comes from a central location (the digital signage computer) and then is distributed to various locations within the structure. Coaxial cable can be split and amplified with the correct hardware also. The option offers good resolution for TVs and is a good way to create a low cost digital signage system , especially when a TV cable network is already in place throughout the facility.
It is also possible to use this same system to connect to plasma or LCD screens, although resolution will generally be very average. We advise against completing a plasma screen installation with coaxial cable whenever possible.
The second option uses Category 5 or 6 cabling to complete your installation. These are the standard cables for data networks and do an excellent job for digital signage networks. Typically, these cables are used to transmit Internet communications to the playback computer, however there are VGA transmitter products that use the same cabling to transmit the video signal. Remember, it is much easier and more cost effective to run cabling if the building is new construction or the walls will be open to complete the installation. Planning your cabling requirements early in the construction and design process will save time and cost.
Wireless installations
For short distance single screen installations, it is possible to use wireless video transmission. With wireless video, one simply plugs a wireless transmitter into the VGA output of the digital signage computer and a wireless receiver into the RCA input jacks of the TV. This system works well in areas without RF interference.
A wireless VGA transmitter is also available for connection to plasma screens. The cost is significantly higher ($600-$900) than a standard wireless TV transmitter. This is due to the fact that the VGA transmitter sends high-resolution images and the TV transmitter sends lower resolution images.
If you are considering using wireless video transmission, we recommend testing the wireless unit with the computer and display screen that you will be using in the planned location before starting the installation.
Security
Wireless Internet security is also an important issue for anyone with a wireless network that includes public access. If your planned installation uses a public wireless network there are several considerations to take into account.
- Generally speaking, a business location with public wireless Internet will already some form of have network security in place. However, always check with the IT department or other knowledgeable person.
- Assign a password for the digital signage network. This is automatically handled with StrandVision Digital Signage.
- StrandVision will make every reasonable effort to contact you if there are security issues, problems with multiple logins with wrong passwords, etc. In addition, data is backed up on multiple servers to protect your valuable content.
If using wireless for a non-public network, we suggest configuring the wireless router to transmit to only one MAC address. This address will belong to the wireless card in the Digital Media Player computer. We also suggest having a cryptic network name, disabling the SSID broadcast and having a 128 bit wireless encryption key.
Section 1 - Where to put the Screen
The first step in any electronic signage installation is to find a suitable location for the display screen. A "suitable location" will based on the construction of the place of business, your budget, the lighting, your traffic, viewing angles and intended purpose of the digital signage software. It is usually not necessary to be a construction expert or architect to do digital signage installations.
This document is intended to be a general overview in a question and answer format of the process of wall mounting plasma or television screens. Since this is an overview only; your local building codes may require different methods or have different rules. Therefore, always work with a building inspector while planning your installation and when working with contractors. For large or complex installations, we recommend working with a general contractor or architect to complete the installation.
Installation of Plasma or TV Screen on a Wall
Question: What building material is the wall made of and what is behind it?
Answer: The materials and strength of walls dictate the mounting brackets and method. Fire rated walls require special treatment and installations must be done by qualified contractors and be properly inspected and approved. Here are some guidelines for the various types of walls.
| Type | Installation Instructions |
|---|---|
| Fire rated wall | For fire wall installations, it is beyond the scope of this document. We suggest working closely with your contractor to determine the best solution or select a different wall to work with. If there is a door along a possible fire wall, open it and look at the edge next to the hinges for a fire rating certification. In some cases it may be possible to use a ceiling or pedestal floor mount for the screen. |
| Drywall with metal studs | Determine the spacing of the metal studs, select the proper wall mount based on the size of the screen. Mark mounting bracket hole locations on wall and drill properly sized holes for mounting bracket hardware (usually toggle bolts). Fasten mounting bracket to wall by inserting toggle bolts in holes. |
| Drywall with wood studs | Same as above except the mounting bracket is fastened using large head wood screws. |
| Plaster with wood studs | Same process as the drywall with wood studs except additional installation costs may be incurred due to the effort needed to locate studs in plaster walls and possible plaster damage. |
| Concrete | Determine desired location of screen, select the proper wall mount based on the size of the screen. Mark mounting bracket hole locations on wall and drill properly sized holes for mounting bracket hardware (many different types of anchors are available). Insert anchor into hole and fasten mounting bracket to wall by tightening fasteners into anchor. |
| Brick | The screen can be installed anywhere on brick wall (except grout lines) using the concrete installation method |
| Plaster or drywall covering brick or concrete | The screen can be installed like a concrete or brick installation. Mounting hardware specifically designed for these applications may be required. |
Question: Is there a power outlet 3 feet from the screen location with 4 to 5 amps of power available?
Answer: If no power outlet is near desired mounting location, an electrical contractor will need to install a power outlet within 3 feet of the desired screen location or another location should be chosen. You may want to install the outlet behind the screen to keep the installation looking sharp.
Question: Is there another option other than wall mounting?Answer: Yes. A less complicated digital sign installation can be completed by installing the plasma display on a specially designed display stand. This option is very quick and easy to install almost anywhere. However, a contractor many need to fasten the stand to the floor to stabilize the screen. This is especially important where required by code and in locations such as bars and factories, where there is a higher risk of damaging the screen.
Question: My company is constructing a new building or doing significant remodeling to our current facility. What type of cables should be run through the walls?Answer: The ideal would be to install conduit from the location of the digital sign playback computer to the screen location(s). The conduit allows easy access to the cabling and makes it easy to upgrade cables in the future. The second best choice depends on what displays are being used. If this is a plasma application, one Category 5 or 6 cable will be run from the digital signage display computer to each plasma screen location. If a TV display is desired, we suggest running both coaxial cable and Category 5 / 6 cable to allow for future upgrades. Using a coaxial cable to each TV location is the lowest cost choice.
Section 2 - Finding the Right Contractor
| Type of Contractor | Area of Expertise |
|---|---|
General Contractor |
A general contractor will be needed for any construction, such as building walls. On large projects the general contractor will usually manage all the other trade contractors to complete the installation. A good general contractor should be able to make recommendations of other trades who do quality and on-schedule work. |
Electrical Contractor |
An electrical contractor will be needed anytime an evaluation of power requirements is required or to have new outlets installed. An electrical contractor may also install network cabling and coaxial cabling. Running these cables may require drilling through various building materials so it is important that the electrical contractor work closely with the general contractor. While electrical contractors install network cabling, they generally do not do anything past the end of the network cable. This means they do not configure network hardware or software. |
Low Voltage Contractor |
A low voltage contractor will install coaxial cabling and network cable. They will also usually complete the connection to the Internet. However, they generally will not configure hardware. |
Audio/Visual Systems Contractor |
A good Audio/Visual systems contractor can be a tremendous asset. For small installations, an A/V contractor may be able to complete all of work needed without requiring the trades listed above. In many cases, the A/V contractor will install the mounting bracket, mount the screen, and connect the hardware for the screen to interface with the computer. Some installers may also be able to configure the Internet connection and Web browser. If your A/V contractor does remote control programming or anything Internet-based, they can easily get the StrandVision software up and running. Check "home theater installation" or "professional audio installer" sections in your local phone book. |
Here are some general tips on contractors:
- All contractors should have commercial liability insurance. Ask to see a copy of your contractor’s insurance.
- Get two or three bids for the best price, however dont look only at price when making your decision.
- Contact references of the contractor's customers with similar jobs completed.
- Develop a good working relationship with your contractors.
- Put the digital signage installation requirements in writing and have the contractor give a cost and time-to-complete-job estimate in writing.
Section 3 - Installation Scenarios
For each channel of digital signage content in each facility, there is one PC that connects to the Internet and there are one of four basic screen configurations. They are:
- Computer monitor located next to the PC
- One or more television (using coax cabling) screens located throughout the facility
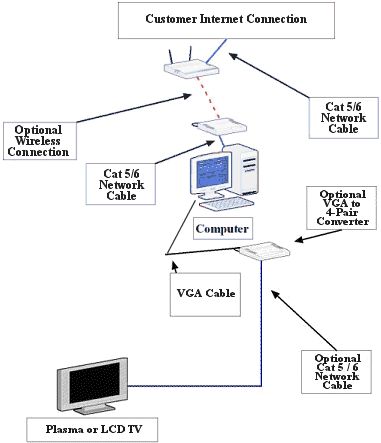
- A plasma or lcd screen located within 25 feet of the PC
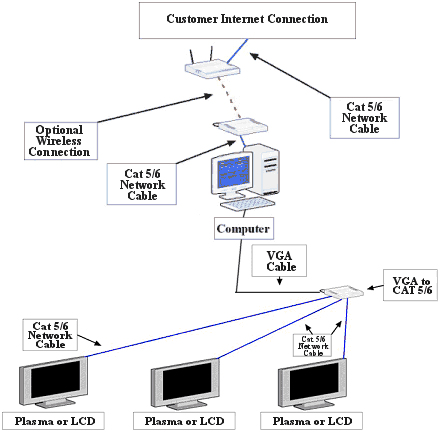
- Multiple Plasma or LCD screens located throughout a the facility
Equipment Needed
For each of the configurations, the items listed in the following table are needed to complete the installation.
| Item | 1 | 2 | 3 | 4 |
|---|---|---|---|---|
| Computer - Windows or Linux based PC with speed of at least 700mhz and 256MB Ram. For video, Windows PC with speed of 2.6ghz and 512MB Ram | Yes | Yes | Yes | Yes |
| Cat 5 or 6 network cable from Internet source to computer or good signal strength wireless internet source | Yes | Yes | Yes | Yes |
| Display/Screen Components | ||||
| Television with built in TV tuner. You may need a cabinet, wall or ceiling mount to hold screen | Yes | |||
| VGA to TV converter - converts the TV signal to RF signal on television channel 3 or 4. May also need coax splitter and amplifier for multiple TVs | Yes | |||
| PC-2-TV.net transmitter and one receiver per screen | Yes | |||
| Computer monitor, Plasma or LCD screen with VGA, DVI or HDMI port input | Yes | Yes | Yes | |
| Plasma or LCD wall mount or optionally, the free standing support that comes with the TV | Yes | Yes | ||
| Wiring | ||||
| Coax television cable | Yes | |||
| Cat 5 or 6 cable from the computer to the display or wireless VGA transmitters | Yes | |||
| VGA, DVI or HDMI cable 6 feet to 25 feet depending on the distance from the PC to the screen | Yes | Yes | ||
| Other | ||||
| Wireless Keyboard and Mouse | Yes | Yes | Yes | Yes |
| Operating system with Internet connection and subscription to StrandVision Digital Signage | Yes | Yes | Yes | Yes |
| Possibly need additional assistance from independent contractors | Yes | Yes | Yes | |
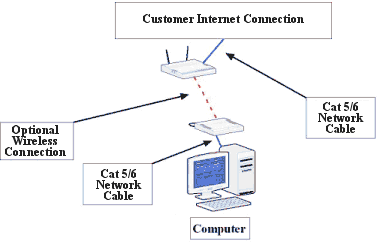
Computer monitor located next to the PC
This basic setup is often used for pilot projects to keep investments to a minimum. This requires no construction services, no drilling, and no complex cabling.
 Installation Steps:
- Determine where to place the screen
- Setup the stand (if needed)
- Setup computer following the manufacturer’s directions
- Attach the network cable to the PC network card or for wireless installation, configure wireless card with appropriate security information
- Place computer into cabinet and monitor on top. Make sure that there is good air flow to keep the computer from overheating
- When Internet connectivity is established (contact your system administrator if you have difficulties), open Web browser and go to: www.strandvision.com
- Log in to your account by entering your user id and password in the area to the left side of the screen, then click "login"
- Press view signage on the left side of the screen
- Run the installer at the bottom of the page
One or more television screens located throughout the facility
Displaying digital signs via a television screen is a cost-effective way to display digital signage on existing wiring and television screens.
Installation Steps:
- Determine where to place the screens
- Setup computer following the manufacturer’s directions
- If ceiling or wall mounts are required, a contractor will be needed to:
- determine the mounting requirements for the screen location
- determine weight and specify appropriate brackets and mounting process
- determine power requirements for the screen and install additional outlet and circuit if needed
- install mounting bracket
- install TV to bracket
- install coaxial cabling through the walls through splitters from the converter box to all screens
 For wireless video installations, after the TV is mounted, connect the wireless adapter to the VGA output on the computer video card. The other end is connected to the television that is set to the correct channel to receive the signal. It is also important that a good signal is obtained by pointing the transmitter and receiver towards each other. The easiest way to do this is to move the receiver until a quality image is displayed.
- Connect the VGA port to the cable converter box or wireless transmitter
- Attach the network cable to the PC network card or for wireless installation, configure wireless card with appropriate security information
- Connect the wireless mouse and keybard to the computer.
- Place computer into storage location. Make sure that there is good air flow to keep the computer from overheating
- When Internet connectivity is established (contact your system administrator if you have difficulties), open Web browser and go to: www.strandvision.com
- Log in to your account by entering your user id and password in the area to the left side of the screen, then click "login"
- Press view signage on the left side of the screen
- Run the installer at the bottom of the page
A plasma or lcd screen located within 25 feet of the PC
 Flat panel screens are an exciting part of the digital signage trend. They offer great picture quality and give a modern edge to any facility. They offer many mounting options because they are lightweight and many models can be installed vertically or horizontally. Our suggestion with flat panel screens is to use a hard wired video connection. The least expensive is high quality VGA video cables that can go 25 feet with minimal signal loss. Although expensive, there are devices that will go much longer distances by converting VGA to 4-pair network cable and back again. These can also be used to split the signal to drive multiple screens from one video source.
Installation Steps:
- Determine where to place the screens
- Setup computer following the manufacturer’s directions
- If ceiling or wall mounts are required, a contractor will be needed to:
- determine the mounting requirements for the screen location
- determine weight and specify appropriate brackets and mounting process
- determine power requirements for the screen and install additional outlet and circuit if needed
- install mounting bracket
- install flat panel screen to bracket
- route VGA cable through the walls and attach between computer and screen
- For floor stand assemblies, assemble the floor stand. Have two people put the screen onto the stand.
- For wireless video installations, after the screen is mounted, connect the wireless adapter to the VGA output on the computer video card. The other end is connected to the VGA port of the screen. It is also important that a good signal is obtained by pointing both the transmitter and receiver towards each other. The easiest way to do this is to move the receiver until a quality image is displayed.
- Attach the network cable to the PC network card or for wireless installation, configure wireless card with appropriate security information
- Connect the wireless mouse and keybard to the computer.
- Place computer into storage location. Make sure that there is good air flow to keep the computer from overheating
- When Internet connectivity is established (contact your system administrator if you have difficulties), open Web browser and go to: www.strandvision.com
- Log in to your account by entering your user id and password in the area to the left side of the screen, then click "login"
- Press view signage on the left side of the screen
- Run the installer at the bottom of the page
Multiple Plasma or LCD screens located throughout a the facility
 When one or more flat panel screens are located farther away than 25 feet, a video extender is required. These will transmit a VGA signal across Category 5 or 6 four-pair network cable. They can transmit from one PC to several screens or run separately to have different content on each screen. We highly recommend working with a professional A/V installer to complete this installation. Wireless transmission devices may be an option as well, however they are often more expensive than having a contractor install wiring.
Installation Steps:
- Determine where to place the screens
- Setup computer following the manufacturer’s directions
- if required, have your contractor
- mount the screens
- power the screens
- if necessary, run cat 5 / 6 network cable to a wall jack at each location
- connect cat 5 / 6 cable from wall jack to video converter
- Attach the network cable to the PC network card or for wireless installation, configure wireless card with appropriate security information
- Place computer into an accessible room. Make sure that there is good air flow to keep the computer from overheating
- When Internet connectivity is established (contact your system administrator if you have difficulties), open Web browser and go to: www.strandvision.com
- Log in to your account by entering your user id and password in the area to the left side of the screen, then click "login"
- Press view signage on the left side of the screen
- Run the installer at the bottom of the page