StrandVision Digital Signage
715-235-SIGN (7446) | www.StrandVision.com
- Home
- Service & Support
- Knowledgebase
- Building a Linux Digital Signage Player
Building a Linux Digital Signage Player
Instructions for Building a Dedicated Linux/Unix Digital Signage Player
Get a stable and less costly CentOS linux digital media player pc or setup an on-premise server by following these steps. Or, if you would like one that is pre-configured and ready to run, you can buy them from us. This document designates specific instructions for the ![]() On-Premise server or the
On-Premise server or the ![]() Signage Player Workstation with the symbol shown.
Signage Player Workstation with the symbol shown.
![]() Following these instructions will destroy everything on your computer's hard drive!!! Select a computer that you are ok to destroy and rebuild as this linux digital signage player pc.
Following these instructions will destroy everything on your computer's hard drive!!! Select a computer that you are ok to destroy and rebuild as this linux digital signage player pc.
Download and Create DVD/CDs
- Go to http://www.centos.org and click on the "Get Centos Linux Now" button to download the latest DVD ISO images.
- Select whether you have a i386 (32 bit) or x86_64 (64 bit) PC. All of our recommended specifications are for a 32 bit pc.
- Select the download method.
- Click download. Depending on your connection speed, this can take several hours to complete the download.
- Burn a DVD for the ISO images
Note: ISO images are not written to DVDs the same way as files - if using Nero, select Burn Image from the file menu. If you have Windows 7 or higher, open with the Windows Disc Image Burner) - Be sure to label the DVD after burning it.
Install The System
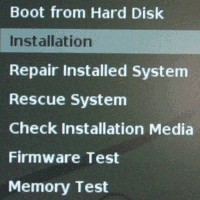
- Select the Installation menu.
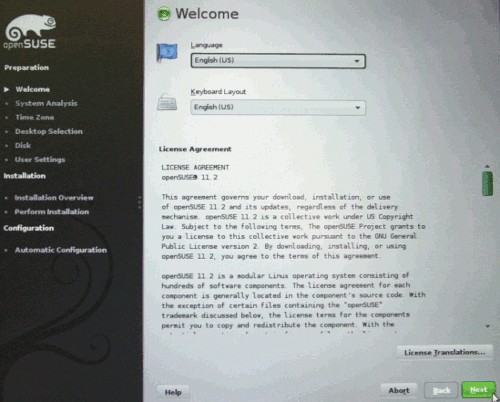
- Begin the installation and select the language for the product and your
keyboard layout.
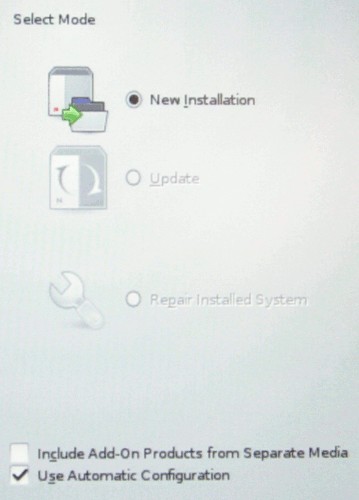
- Select New Installation
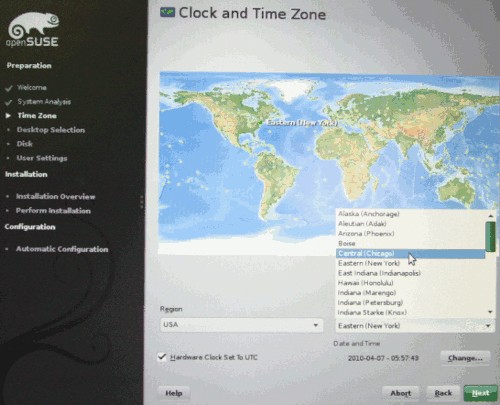
- Select the time zone to GMT.
 If creating an on-premise server, select Other, then select Minimal Server Selection (Text Mode).
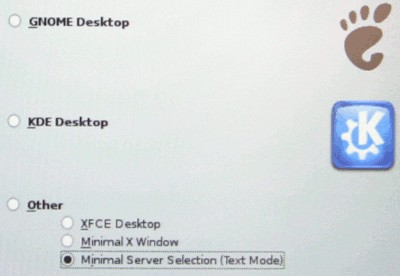
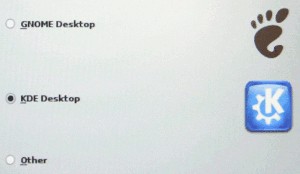
 If creating a signage viewing workstation, select the minimal desktop.
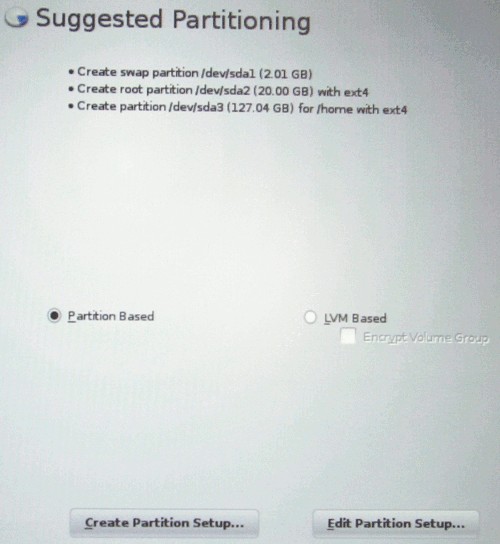
- Choose the automatic disk partitioning unless you know what you are doing. It should remove all paritions and start from scratch.
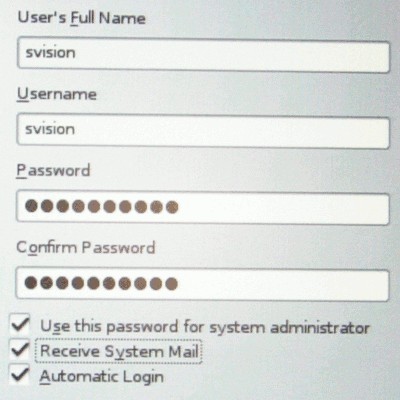
- Create the user svision with a password of your choosing that is secure and something you will remember. Be sure to check all checkboxes so that this is the system administrator password as well.
- Click on the Install button on the lower right side of the screen.
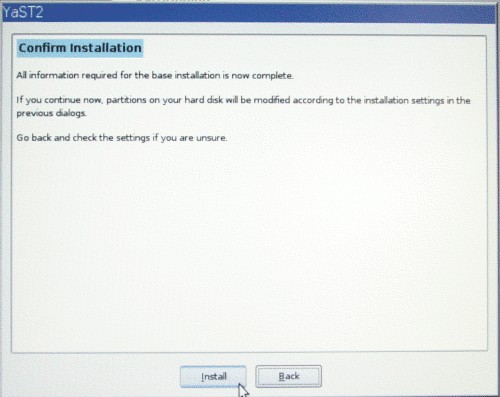
- The system will now build the linux platform which will take about 30 minutes.
Update the Server
- Press Ctrl-Alt-F2 and log in as root
- Refresh the repositories by typing "yum -update"
Install StrandVision Startup Code
- set your default directory to the web directory by typing "cd /home/svision"
- type "curl http://www.strandvision.com/webcache/linuxremote.tar.gz | tar xvz"
- type "chmod u+x remoteinstall.sh"
- Initialize the system by typing"./remoteinstall.sh"
- restart the server by typing "shutdown -r now"
Check Web Server
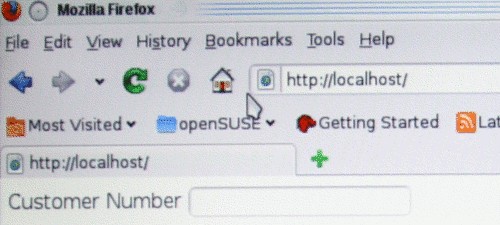
- Open up Firefox and type localhost.
- Open up a web browser from a separate computer and type the server's ip address.
- It should come up with a spot to enter the StrandVision username and password. This is where the customer starts setting up the system for their unique StrandVision Digital Signage account.
Configure the Sound
- Click on the speaker in the upper right corner and select "Mixer"
- Click Settings, Configure Channels
- Show the Line and Mic inputs
- Set the volume to the maximum for the Master, PCM and Line controls.
- Mute Line and Mic inputs
- Close the window.
Configure the Flash Player
- open up the flash standalone player by clicking the start icon and typing "flash" in the search bar.
- type http://localhost/flash/sign.swf into the url
- add this to the bookmark
- right click on the display and click settings
- click on the second icon and allow access to microphone and camera for localhost and set the remember checkbox
- click close to save the settings.
- Close the flash player by pressing Alt-F4
- add a desktop icon for flashplayer http://localhost/flash/sign.swf
Setup Simultaneous Analog and Digital Audio
- Select the HDMI audio output in the hardware tab
- Click on the terminal icon in the graphical area (needed to access the sound for this window)
- run "aplay -l" to get the list of audio cards
- find the analog card and device number
- edit the pulse audio config by editing /etc/pulse/default.pa
- Read the list and copy the names of the sinks (without the enclosing brackets) that you want to combine.
- before the "automatically restore the default sink/source ...", add the following lines (replace the hw:x,x with the hardware card,device numbers you identified earlier)
- load-module module-alsa-sink device=hw:0,0
- load-module module-combine sink_name=combined
- #set-sink-volume 0 65535
- reboot
- The new combined sink will show up as a selection on the output tab
- Much of this came from https://wiki.archlinux.org/index.php/PulseAudio/Examples, http://www.deseret-tech.com/journal/pulseaudio-combine-sinks-for-simultaneous-output and http://forums.linuxmint.com/viewtopic.php?f=199&t=107653
Make Hard Drive Image (StrandVision Only)
- Using a Windows, Mac or Linux pc, download CloneZilla Live. There are several options, but it is recommended to download the Debian stable release at http://clonezilla.org/downloads.php.
- Create a bootable CD from the .iso image with your burning software.
- Locate an external USB CD / DVD drive and attach it to the StrandVision R350 Linux PC
- Put the CloneZilla bootable CD into the external Drive
- Turn on the player
- Press the delete key several times until it says "entering setup"
- Select the "Boot" menu by pressing the right arrow twice
- Select "USB Drives" with the down arrow and press enter
- Find the USB DVD drive and position on it
- If it is not the top item in the list, press the minus key on the keypad to move it to the top
- Press escape to go back
- Select "Boot Device Priority"
- Find USB DVD drive and position on it
- If it is not the top item in the list, press the minus key on the keypad to move it there
- Press F10 to exit. Save the settings if it asks
- The system will reboot using the dvd drive
- A CloneZilla screen will appear. Press enter a few times until you get to the imaging options.
- Image the boot drive to an external hard drive
- Once finished, restart the program again.
- make an ISO image from the hard drive image just created
- Upload to the production servers.
- Follow these instructions if you are a production house.
Restore a StrandVision Image
To restore a StrandVision image, follow this link.
To Add Samba File Sharing:
Other Commands
- Create a tar file: tar -cvzf filename.tar.gz dirname/
- Find file: find dir -name filename*.*
- create disk image to a gzip: dd if=/dev/sda conv=noerror,sync bs=1024 | gzip -c9 > /flash/filename.img.gz
- clear unused portions with zeros: mount -t ext4 dev/sda1 /flash; dd if=/dev/zero of=/flash/delete.me bs=8M; rm /flash/delete.me; umount /flash