StrandVision Digital Signage
715-235-SIGN (7446) | www.StrandVision.com
- Home
- Restoring a Linux Archive
Restoring a Linux Archive
Typically used to make a master hard drive image for computer suppliers…
This document describes the steps involved to restore a StrandVision Digital Signage linux archive file that is built off of Suse Linux 11.2.
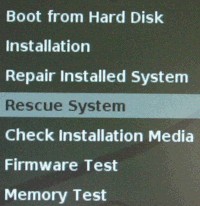
![]() Following these instructions will destroy everything on your computer's hard drive!!! Select a computer that you are ok to destroy and rebuild.
Following these instructions will destroy everything on your computer's hard drive!!! Select a computer that you are ok to destroy and rebuild.
Download and Create DVD
- If you have downloaded and created the OpenSuse 11.2 DVD before, you can skip this section
- Go to http://www.opensuse.org and click on the "Get It" button (http://software.opensuse.org/112/en gets to the 11.2 download directly) to download the latest DVD ISO images.
- Select a 64 bit PC. All of our recommended images are built for specific model computers and they all are 64 bit.
- Select the download method.
- Click download. This will take several hours to complete the download.
- Burn a DVD for each of the ISO images (Note: ISO images are not written to DVDs the same way as files - if using Nero, select Burn Image from the file menu)
- Be sure to label the DVD after burning it.
- You may want to consider burning two images or saving the original .iso file in case of a dvd failure for image restores of different versions in the future.
Download and Save the Archive File
- On any pc, download the .img.gz file as specified by StrandVision.
- Download the .img.md5 file (same prefix, just replace .gz with .md5)
- Copy the files to a 4GB or larger USB Thumb Drive or Hard Drive formatted as NTFS
Test the Image
- Be sure the ROM BIOS is configured to boot from the DVD if there
- Boot from the DVD
- Move the menu within 10 seconds to select "Rescue System"
- Login as root with no password.
- Attach the USB hard drive formatted for ntfs (normal windows).
- List the partitions that are available with: "cat /proc/partitions"
- Make note of the first one which is the hard drive on the pc (for example sda)
- Make note of the last one which should be the usb drive volume. (for example sdb1 or sdc1)
- make a temporary directory with: "mkdir /flash"
- create a test file with: "echo hello > /flash/xyz"
- list the files in the flash directory (should only show xyz file) with: "ls -l /flash"
- Mount the usb drive with: "mount -t ntfs /dev/sdb1 /flash" (replace sdb1 with the usb volume)
- The xyz file should NOT show and the downloaded files should show with: "ls -l /flash"
- Generate a new checksum file with: "md5sum /flash/filename.img.gz > this.md5" (replace filename with the one you downloaded and verified)
- Compare the checksums with: "cmp /flash/filename.img.md5 this.md5" (replace filename with the one you copied)
- The CMP command will not say anything if the file is correct. If it shows a difference, then the file is corrupt and you need to start over.
Restore the Image
- Type the following (CAREFULLY) to restore the archive (replacing sda with the hard drive and filename.img.gz with the file you downloaded and copied onto the usb drive. This will take several hours because it writes to the entire hard drive. The screen saver will come on after a few minutes. You can restore the screen by pressing the Backspace key. Once the command prompt appears again, it is finished.
- gunzip -c /flash/filename.img.gz | dd of=/dev/sda conv=noerror,sync bs=1024
Test The Installation
- Once the restore is complete, remove the DVD and press and hold the power button until it turns off.
- Turn the system back on.
- Once it comes up, you should be able to run the web browser and have internet connection.
- If it does not come up, contact StrandVision for assistance.
Make the Hard Drive Image
The pc is now properly setup to make your normal image. Follow your existing processes to image the hard drive for production
For each Computer Built - do the following
Change the Passwords
- Press Ctrl-F1 to open the command console.
- Log in with username root and password strandvision
- Change to the home directory with: "cd /home/svision"
- Create the pc's unique login information with: "echo root,serial number > sqladmin.txt"
- within a minute, the system will automatically change all the root passwords to the serial number typed in this file
Do the Burn In
- To do the burnin, type
- zypper up &
- ./test.sh &
- type "top -c" to see a continuous running status of the server load. Press "q" to exit.
- There will be occasional times when messages go all over the screen - and it will be very slow, so be sure you are done configuring.
- Check it in 24 hours. If still running, all is good.
- optionally stop all processes by typing "killall bzip2".
- Shut the pc down properly by typing "Halt".