StrandVision Digital Signage
715-235-SIGN (7446) | www.StrandVision.com
- Home
- Converting an ISO DVD image to a bootable usb flash drive for the Linux Player
Converting an ISO DVD image to a bootable usb flash drive for the Linux Player
Convert an ISO DVD image to a bootable usb flash drive for the Linux Player
The following are instructions for converting a StrandVision R360 Linux Digital Media Player bootable ISO file to work on a USB flash drive. You need to use a Windows pc to download the ISO file and make the bootable USB thumb drive. It is easiest if that is your normal workstation.
Download the Bootable Image
The following steps need to be done on a Windows pc - and it is easiest to do it at your own personal workstation since the downloads can take a while to complete.
- Download the linux digital signage ISO file to your hard disk. The current version is at http://www.strandvision.com/data/svplayer_c67_20150929.iso. This is around 1.3GB, so it will take time and will use a lot of your corporate bandwidth, so if needed, download it overnight.
- Open http://www.strandvision.com/data/svplayer_c67_20150929.md5. The first part of this is the MD5 checksum.
- Download http://www.strandvision.com/data/md5sum.exe or extract http://www.strandvision.com/data/md5sum.zip and run it.
- Click the browse button and select the .iso file you downloaded. A sample of the screen is shown below (your screen will be different since your iso is newer):
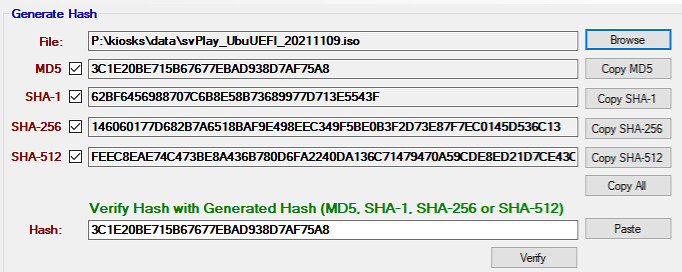
- Once it is finished, paste the MD5 checkum into the verify hash spot and click verify.
- If it did not verify properly, try downloading the .iso file again or contact StrandVision.
Prepare USB Thumb Drive
These steps will build a bootable USB thumb drive and must also be done on the same Windows pc as the download step.
- Insert your USB flash drive into your Windows pc. It should pop up a window allowing you to explore the contents of the thumb drive.
- Right click on the drive letter for the flash drive and click on format. Do the format even if it is a new USB device. A Quick format is ok and it MUST be formatted using the FAT32 format type. It will not work with NTFS format.
- Download Rufus or unetbootin and save the Windows version to your desktop.
- Run that program (it does not need to be installed).
- Pick your thumb drive from the drive selections (at the bottom on unetbootin, top on rufus)
- On unetbootin, select the Diskimage radio button with the ISO drop down settig and browse to the DVD ISO image file that you downloaded.
- On Rufus, set the "Create a bootable disk using" to "ISO Image" and browse to the DVD ISO image file by clicking the icon next to the selection. If it asks to download something, do that. If it asks about using DD instead of ISO format, select DD mode.
- Click OK to start the process.
- At the end with unetbootin, it will ask if a file should be overwritten. Say no if you happen to see it. If you wait too long, it automatically overwrites it - which also is fine.
- When all done, click exit (not reboot).
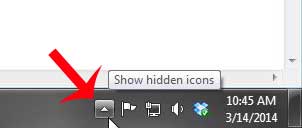
- IMPORTANT: Safely eject your USB thumb drive by clicking on the upward pointing arrow (to show hidden icons) at the bottom-right corner of the screen.
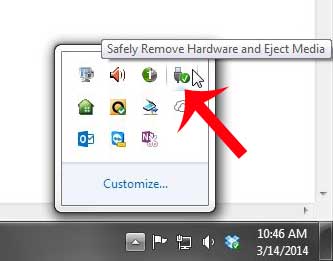
- Right click the "Safely Remove Hardware and Eject Media" icon. Sometimes this is in your taskbar (not hidden)
- If you are not running Windows 7+ and do not know how to eject your usb drive, wait a minute or so to be sure that everything is written.
- Remove the thumb drive.
Rebuild the Linux Digital Media Player Operating System
Your thumb drive is now ready to upgrade your StrandVision player. These steps (and all remaining ones) must be done directly on the StrandVision player. If it is easier, you can relocate the StrandVision player to your office until everything is completed.
- Turn off the strandvision linux digital media player
- Attach a keyboard, mouse and easy to view monitor to the player
- Attach the thumb drive to a USB port
- Turn on the digital media player
- Press the boot menu key while the bios is appearing to pick a different boot device.
- On the R360 and R370 shuttle pc, the boot menu key is F7.
- On the R350 aOpen pc, the boot menu key is F11.
- On the R250 Intel NUC pc, the boot menu key is the F10.
- Once the boot menu appears, select something similar to "Generic USB drive" or sometimes just "Flash". Every USB thumb drive has different options available, so you may need to try several of the options to find the appropriate USB thumb drive options until it boots up to the CloneZilla screen.
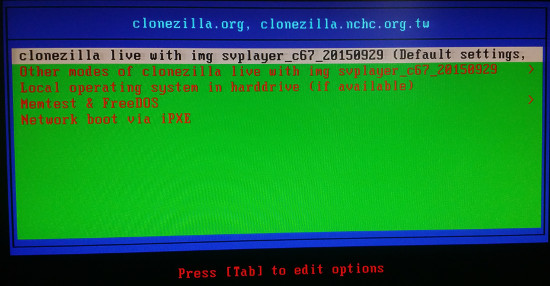 If you picked the right device, a CloneZilla text menu screen will appear. If it does not, restart the process and select a different USB boot device.
- Press enter on the first menu screen to continue.
- The system will do a bunch of stuff to initialize. If you see LVM2 error messages, that is normal.
- Confirm that you want to overwrite your hard disk twice.
- The image will be restored in 3 to 5 minutes.
- When it is done, a menu will appear giving you the option to poweroff, reboot, cmd or restart. Select the reboot option and when the screen clears, disconnect the usb drive
Setup Static IP Address (if needed)
The digital media player is configured to use DHCP automatically, so only follow the steps from this section if you need a static ip address.
- You will need the root password to make these changes. When the system is first built, the password is "strandvision" (without quotes). Once the system is initialized, the password is changed. You can get your root password by contacting StrandVision at 715-235-SIGN (7446) or open firefox to "localhost" and click on the Setup, Show Root Password menu selection.
- If the signage is running, press the escape key to turn the signage to a window followed by the 'W' key to lock it there. Then drag it off to the side.
- Click on System, Preferences, Network Connections
- Click on System eth0 device
- Click Edit
- Click on the IPv4 Settings tab
- Set method to Manual
- Click the Add button
- Click on the IP Address section and replace what is there with the Static IP Address.
- Click on the Network Mask column to the right of the IP Address. Remove what is there and type your network mask
- Click on the Gateway column to the right of the IP Address. Replace what is there with the Gateway. If the Apply button does not activate, then you may have an unreachable gateway based on your mask settings.
- Click inside of the DNS Servers box and replace with your dns servers separated by a comma
- Click Apply and close the box. You may need your root password here. If the Apply box is grayed out, then something is wrong with your IP address, mask or gateway information.
- If you have other wired or wireless ethernet devices listed, set the same values for all other devices.
Activate StrandVision
Once the StrandVision player restarts, it must be re-initialized to communicate properly with the StrandVision Digital Signage network.
![]() Note: If the pc (with the same mac address) had been running within the past 3 months, your pc will automatically rebuild using the previous settings.
Note: If the pc (with the same mac address) had been running within the past 3 months, your pc will automatically rebuild using the previous settings.
- Open up FireFox and type "localhost" on the web url.
- If there are any issues that need to be addressed, you will see a message on the screen. Most errors (except for internet connection issues) will auto-correct within a minute or two. If there is an internet connection issue, verify your network connection and settings. The system checks for changes and refreshes this message once per minute.
- Once everything is properly initialized and the latest software downloaded from the StrandVision cloud, a form will appear to enter the information to activate the system.
- The first screen is for your model/serial number. Locate your pc’s model number and serial number. It is a bar coded label on the back or side of your pc. It is also on the original box that came with the pc if you still have it (a little larger print). On the R250 pc (Intel NUC), you will only enter the serial number.
- Enter the model/serial number inforation in the format specified.
- The system will configure the databases and set the root password to the last 12 characters of the serial number (converted to upper case).
- When it asks, enter your digital signage username and password. StrandVision may have provided this to you already. Note that this is NOT the root username and password. It is your StrandVision web site login information. If you have multiple screens on your account:
- go to StrandVision.com
- log into your signage account
- Click on Signage Pages / View Signage
- Select the appropriate screen from the drop down list at the top of the screen
- use the username and password that appears in the "Play your Signage on a TV Display" section
- When the digital signage username and password has been verified by the StrandVision servers, it will show a status of the installation progress which can take up to 30 minutes to fully complete.
- Once the system has enough information to start, the signage will appear in full screen mode.
- If you ever need to keep this from being full screen mode, click on the screen to give it focus and press the escape key followed by "W" key (window) to toggle full screen and lock it into window mode.